Baby back ribs have a reputation problem. Not a flavor problem — anyone who has eaten a properly cooked rack of baby backs knows exactly what they are capable of: tender, juicy, deeply porky meat that pulls cleanly from the bone with just enough resistance to feel satisfying, coated in a sticky, caramelized glaze that has been built up over heat into something lacquered and complex. The reputation problem is the effort. Ribs, in the popular imagination, require a smoker, or a charcoal grill, or a four-hour oven braise followed by a careful barbecue finish, or some combination of all three. They are a weekend project. They are something you do when you have time and equipment and the inclination to commit.
This recipe disagrees with that reputation entirely.
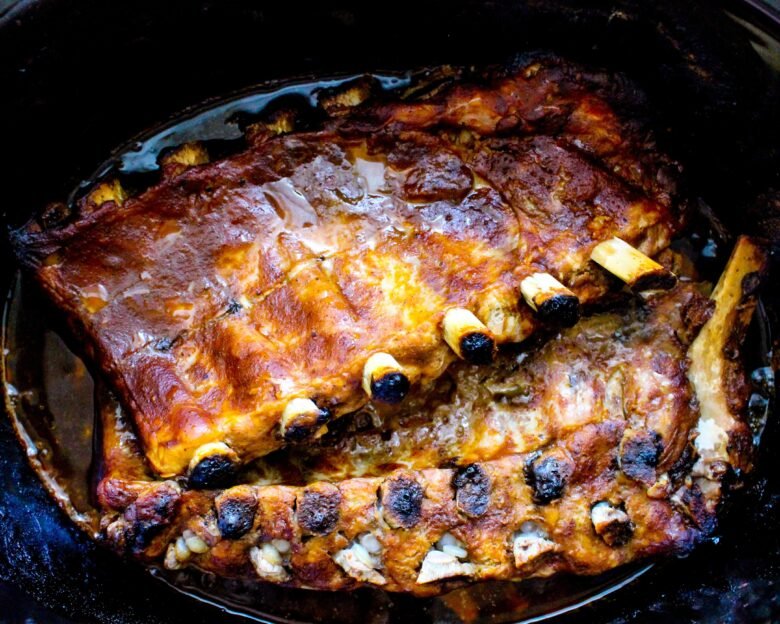
Three ingredients. A slow cooker. A broiler. The result is baby back ribs so tender they slide from the bone at the lightest pull, coated in a caramelized, sticky glaze that clings and chars at the edges under the broiler into something that looks and tastes like it spent the afternoon on a grill. The slow cooker does the heavy lifting — hours of low, moist heat that breaks down the collagen in the ribs completely, rendering the meat to a yielding, falling-off-the-bone tenderness that no amount of grill time alone can produce. The broiler does the finish — five minutes that transforms pale, slow-cooked ribs into the caramelized, charred, restaurant-quality rack that nobody expects from a slow cooker recipe.
Three ingredients. That is genuinely all this takes.
Why the Slow Cooker Produces Better Ribs Than You Expect
Baby back ribs are one of the cuts of meat most naturally suited to the slow cooker’s strengths, and one of the least intuitively obvious choices for it.
Ribs are bone-in, collagen-rich, and surrounded by connective tissue that must break down completely before the meat reaches its characteristic tender, yielding texture. That breakdown happens through time and moisture at a sustained low temperature — the exact environment the slow cooker provides. At the LOW setting, the slow cooker holds between 190°F and 200°F (88°C to 93°C) for the entire duration of the cook, which is precisely the temperature range at which collagen converts to gelatin, fat renders out gradually into the meat, and the muscle fibers relax completely without the protein-seizing contraction that high, dry heat produces.
The result after 5 to 7 hours on LOW is ribs that have achieved what the barbecue world calls “the bend test” — when you pick up the rack in the middle, the ends bend downward and the meat cracks slightly at the surface, a sign that the collagen has converted fully and the ribs are ready. The meat pulls cleanly from the bone without tearing, which is the textural definition of perfectly cooked ribs regardless of the method used to get there.
What the slow cooker cannot do is produce the caramelized, charred surface that makes ribs visually and texturally dramatic. That is the broiler’s job — and under high heat for five minutes, with a coat of sticky BBQ sauce applied and reapplied, the surface of the ribs caramelizes into the glossy, lacquered finish that makes this recipe worth photographing.
The slow cooker and the broiler together produce ribs that rival low-and-slow smoked ribs in tenderness, and exceed them in convenience by a significant margin.
The Three Ingredients
Three ingredients sounds like a constraint. In this recipe, it is a design decision — the three ingredients chosen do exactly what is needed and nothing is missing.
The rack of baby back ribs is the first ingredient and the most consequential decision. Baby back ribs come from the upper portion of the pig’s rib cage, where the ribs meet the spine — smaller, leaner, and more curved than spare ribs, with meat that is naturally more tender and cooks faster. A full rack weighs between 1.5 and 2.5 pounds and feeds two to three people comfortably. For feeding four to six, two racks — stacked or curled in a large oval slow cooker — work well, with no significant change to the cook time.
The membrane on the back of the ribs — a thin, papery layer of connective tissue that covers the bone side — should be removed before cooking. It does not break down during the slow cook, acts as a barrier to seasoning penetration, and produces a tough, chewy layer in the finished ribs. Removing it takes 30 seconds: slide a butter knife under the membrane at one end of the rack, grip it with a paper towel for traction, and pull. It comes off in one piece when done correctly. This is the closest thing to prep in this recipe and it is not optional.
The dry rub is the second ingredient — and the word “ingredient” here means a blend, not a single component, because a three-ingredient recipe does not mean a three-flavor recipe. A good rib rub contains salt, pepper, brown sugar, smoked paprika, garlic powder, onion powder, cayenne, and dried mustard at minimum. Every component of the rub does specific work: the salt seasons and draws moisture to the surface; the brown sugar caramelizes under the broiler into the sticky crust; the smoked paprika provides color and the approximation of smokehouse depth; the garlic and onion powders are the aromatic backbone; the cayenne and mustard add complexity and heat. Mixed together and applied heavily to every surface of the rack, this rub is what seasons the ribs from the outside in during the slow cook and what caramelizes into the crust during the broil.
BBQ sauce is the third ingredient — and the choice of BBQ sauce matters more in a three-ingredient recipe than it would in a twelve-ingredient one, because it is the dominant flavor of the finished dish. Use a sauce you genuinely enjoy eating on its own. A classic, smoky Kansas City-style sauce — thick, dark, slightly sweet, with a vinegar tang and smoke — is the default and the most versatile. A Carolina vinegar-based sauce produces a brighter, tangier result. A honey BBQ sauce adds sweetness that caramelizes particularly well under the broiler. Whatever style, avoid thin, watery sauces — they run off the ribs before they caramelize. The sauce should be thick enough to coat the back of a spoon.
The Rub and the Sauce: Doing More With Three Ingredients
The flavor architecture of this recipe is worth understanding, because it explains why three ingredients produce a result that tastes considerably more complex than three ingredients should.
The dry rub is applied to the ribs before they go into the slow cooker and has 5 to 7 hours to penetrate the meat during the braise. Salt, which is the most important component of the rub, draws moisture to the surface in the first hour and then drives the dissolved spices back into the meat as the braise progresses. By the time the ribs come out of the slow cooker, the rub has ceased to be a surface coating — it has become the flavor of the meat itself, distributed throughout every bite.
The BBQ sauce, by contrast, is applied at the broil stage — it never goes into the slow cooker. This is intentional. BBQ sauce applied during the slow cook breaks down over hours into its component parts, losing its structure and producing a diluted, slightly flat result. Applied at the end, to ribs that have already been fully cooked by the slow cooker, the sauce retains all of its complexity and then caramelizes under the broiler into something entirely new — the sugars in the sauce char slightly at the edges, the vinegar evaporates and concentrates, the smoke in the sauce deepens. One coat of sauce, then back under the broiler. Another coat, another minute. The layers build into a glaze that is sticky, complex, and deeply flavored.
Three ingredients. Three stages of flavor development. The result is greater than the sum of its parts.
The Broiler Finish: The Step That Makes the Recipe
Everything that happens in the slow cooker over 5 to 7 hours is essential — but the five minutes under the broiler is what makes this recipe worth repeating.
Slow cooker ribs without a broiler finish are tender and well-seasoned but visually and texturally incomplete — pale, soft, without the caramelized surface that is the defining characteristic of great ribs. The broiler addresses this in minutes and requires nothing more than a baking sheet and attention.
The method. Transfer the cooked ribs from the slow cooker to a foil-lined rimmed baking sheet, bone side down. Apply a generous coat of BBQ sauce to the top of the rack using a pastry brush or the back of a spoon, covering every surface. Place under the preheated broiler 5 to 6 inches from the element. Watch constantly. After 3 to 4 minutes the sauce will be bubbling and beginning to char at the thinner edges. Apply a second coat of sauce directly over the first — the first coat provides the base; the second coat adds another layer of glaze and prevents the surface from drying out. Return to the broiler for a final 1 to 2 minutes until the second coat is caramelized, sticky, and dark at the very edges.
Remove immediately. The window between perfectly caramelized and burnt at the broiler stage is narrow — 60 seconds can be the difference. The finished rack should be deeply colored, lacquered, and glistening, with slightly charred edges where the sugar in the sauce has caramelized most intensely. That char at the edges is not a mistake — it is the best bite on the rack.
Tips for Perfect 3-Ingredient Slow Cooker Baby Back Ribs
1. Remove the membrane. The membrane on the bone side of the rack does not soften during the slow cook. It stays tough, acts as a barrier to seasoning penetration, and produces a chewy, unpleasant layer in the finished ribs. Remove it before seasoning. Slide a butter knife under the corner of the membrane, grip with a paper towel, and pull firmly. It comes off in one sheet when fresh.
2. Apply the rub generously and let it sit. The rub needs to be applied to every surface — top, bottom, and the curved sides of the rack. Press it in firmly so it adheres. If time allows, leave the seasoned rack uncovered in the refrigerator for 30 minutes to an hour before cooking — the salt begins its penetration work immediately and the surface dries slightly for a better bark under the broiler. If no time allows, season and cook immediately — the 5 to 7 hour braise provides adequate time for seasoning penetration.
3. Curl the rack to fit. Baby back racks are typically 18 to 24 inches long — too long to lie flat in most standard oval slow cookers. Curl the rack into a C-shape, meat side facing out, so the ribs stand upright around the perimeter of the insert. They will relax and settle during cooking. Alternatively, cut the rack in half or thirds with kitchen shears before adding — shorter sections lie flat and cook slightly more evenly.
4. No added liquid. Unlike most slow cooker recipes, ribs do not need added liquid. The fat and natural moisture in the rack are sufficient to create the steam environment the slow cooker requires. Added liquid produces watery, boiled-tasting ribs rather than the concentrated, tender result that comes from cooking the ribs in their own rendered fat and juices.
5. LOW only — always. Ribs on HIGH cook faster but produce a tighter, drier result and the collagen conversion is less complete. The difference between HIGH-cooked and LOW-cooked ribs in a slow cooker is significant and immediately detectable. Cook on LOW for 5 to 7 hours. Do not rush it.
6. Apply the BBQ sauce only at the broil stage. BBQ sauce in the slow cooker breaks down over hours and produces a flat, diluted result. Apply it only when the ribs come out — at the broil stage, it caramelizes and builds the glossy, complex glaze that is the visual signature of great ribs.
7. Two coats under the broiler. One coat of sauce applied and broiled produces a good result. Two coats — the second applied directly over the first mid-broil — produces a layered, deeply caramelized glaze that is significantly better. The technique takes two extra minutes and makes a visible difference.
8. Rest before cutting. Rest the broiled rack for 5 minutes before cutting between the bones. The juices redistribute and the glaze sets slightly — cleaner cuts, juicier ribs.
Serving the Baby Back Ribs
Baby back ribs are one of the few dishes that come with their own established cultural context for how they should be served, and that context exists because it is correct.
The classic sides — coleslaw, corn on the cob, baked beans, and potato salad — exist alongside ribs because they provide exactly the balance the richness of the meat requires. Coleslaw is cool, creamy, and acidic. Corn is sweet and simple. Baked beans are savory and earthy. Potato salad is rich but neutral. Every one of them is there for a reason.
Cornbread alongside — whether from scratch or a box — for soaking up the sauce and the rendered drippings on the plate.
Extra BBQ sauce warmed and served alongside for dipping — always. Even with a well-glazed rack, extra sauce on the side is the correct move.
Paper towels on the table. Ribs are not a fork-and-knife situation. They are eaten with the hands, which means paper towels are not optional — they are part of the service.
The Complete Table
Sides:
- Classic creamy coleslaw — the essential acidic contrast
- Baked beans — savory, smoky, and complementary
- Corn on the cob with butter — sweet and simple
- Potato salad — creamy and neutral
- Cornbread — for the sauce and drippings
- Mac and cheese — for a fully committed comfort food spread
Garnishes that elevate:
- Extra warmed BBQ sauce alongside for dipping
- Pickled red onions — bright and acidic, cutting the richness perfectly
- Sliced jalapeños for heat
- Fresh flat-leaf parsley or cilantro scattered over the finished rack
Drinks:
- A cold lager or IPA — the definitive rib pairing
- Sweet iced tea — classic Southern table drink
- A full-bodied red — Zinfandel or Shiraz — for wine drinkers
The Day-After Rib Sandwich
Cold leftover baby back rib meat, pulled from the bone, reheated in a skillet with a splash of extra BBQ sauce until sticky and caramelized at the edges — piled high on a toasted brioche bun with creamy coleslaw on top and a pickle alongside — is the best use of leftover ribs outside of eating them cold directly from the refrigerator at midnight, which is also a respectable option. The sauce re-caramelizes beautifully in the skillet. The coleslaw on the sandwich does what coleslaw always does — provides the cool, creamy contrast that the rich pork needs. Plan the leftovers.
Easy Variations
- Honey garlic ribs. Replace the BBQ sauce with a mixture of ½ cup honey, 3 tablespoons soy sauce, and 4 minced garlic cloves. Apply and broil as directed. The honey caramelizes more intensely than standard BBQ sauce and produces an almost lacquered, Asian-inspired glaze.
- Spicy ribs. Add 2 teaspoons of cayenne to the dry rub and use a spicy BBQ sauce or mix standard sauce with Frank’s RedHot in a 2:1 ratio. Finish with sliced fresh jalapeños on the plate.
- Brown sugar and mustard ribs. Mix 2 tablespoons of Dijon mustard into the BBQ sauce before applying. The mustard adds a sharp, savory depth that cuts the sweetness and produces a more complex glaze.
- Dr Pepper ribs. Pour half a can of Dr Pepper into the slow cooker before adding the ribs — the only variation that uses added liquid. The soda’s caramel notes and acidity penetrate the meat during the braise and produce a distinctly sweet, complex flavor that pairs particularly well with a smoky BBQ sauce finish.
- Apple cider vinegar ribs. For a Carolina-style result, combine ½ cup apple cider vinegar with ¼ cup brown sugar and a teaspoon of red pepper flakes as the finishing sauce instead of standard BBQ sauce. Brighter, more acidic, and completely different in character from the classic version.
Make-Ahead and Storage
Make-ahead: The ribs can be slow cooked a full day ahead and refrigerated bone-side down in their cooking juices. When ready to serve, bring to room temperature for 30 minutes, apply the BBQ sauce, and proceed with the broil finish. The slow-cooked ribs hold extremely well overnight and the meat is actually easier to handle when slightly chilled and firmed up.
Refrigerator: Leftover ribs keep wrapped tightly in foil for up to 4 days. Reheat in a 300°F (150°C) oven wrapped in foil for 20 to 25 minutes until warmed through, then unwrap and apply fresh BBQ sauce and broil for 2 to 3 minutes to restore the glaze. Microwaving works but softens the glaze — the oven method is superior.
Freezer: Cooked ribs freeze well for up to 3 months, wrapped tightly in plastic wrap and then foil. Thaw overnight in the refrigerator and reheat as above. The texture after freezing and reheating is slightly less pristine than fresh — excellent for sandwiches and pulled rib applications.
The cooking juices: The rendered fat and juices that accumulate in the slow cooker during the rib braise are deeply flavored pork drippings. Strain and refrigerate — the fat rises and solidifies overnight, making it easy to remove. The clarified juices beneath are extraordinary used as a base for baked beans, a braising liquid for pork shoulder, or stirred into BBQ sauce for an extra layer of depth.
Shopping List
The Three Ingredients
- 1 rack baby back ribs, 1.5–2.5 lbs (680g–1.1kg), membrane removed
- BBQ sauce, ¾ to 1 cup (180–240ml) — your preferred brand and style
The Dry Rub (counts as one ingredient)
- 1½ tsp salt
- 1 tsp smoked paprika
- 1 tsp brown sugar
- ½ tsp garlic powder
- ½ tsp onion powder
- ½ tsp black pepper
- ¼ tsp cayenne pepper
- ¼ tsp dried mustard powder
For Serving
- Extra BBQ sauce for serving
- Classic coleslaw, baked beans, and corn on the cob
3 Ingredient Slow Cooker Baby Back Ribs
A full rack of baby back ribs, membrane removed and rubbed generously on all sides with a smoky-sweet dry rub of salt, smoked paprika, brown sugar, garlic, and cayenne — curled into a 6-quart slow cooker with no added liquid and cooked on LOW for 5 to 7 hours until the meat pulls from the bone at the lightest touch and the rack passes the bend test. Transferred to a broiler, coated in two layers of BBQ sauce applied mid-broil, and finished until the glaze is caramelized, sticky, and charred at the edges. Three ingredients. The ribs everyone asks for the recipe to.
- Total Time: 5 hours 21 minutes
- Yield: 2–3 servings per rack 1x
Ingredients
The Rack
- 1 rack baby back ribs, 1.5–2.5 lbs (680g–1.1kg)
The Dry Rub
- 1½ tsp salt
- 1 tsp smoked paprika
- 1 tsp brown sugar
- ½ tsp garlic powder
- ½ tsp onion powder
- ½ tsp black pepper
- ¼ tsp cayenne pepper
- ¼ tsp dried mustard powder
The Glaze
- ¾ to 1 cup (180–240ml) BBQ sauce, divided, plus more for serving
Instructions
- Remove the membrane. Lay the rack bone-side up on a cutting board. Slide a butter knife under the thin papery membrane at one end of the rack to loosen a corner. Grip the loosened edge firmly with a paper towel and pull steadily — it should release in one piece. Discard.
- Make and apply the rub. Combine all dry rub ingredients in a small bowl and mix well. Apply the rub generously to every surface of the rack — top, bottom, and sides — pressing it firmly into the meat so it adheres. Apply more than feels comfortable. All of the rub should be used.
- Load the slow cooker. Curl the rack into a C-shape, meat side facing outward, and stand it upright around the inside perimeter of a 6-quart oval slow cooker. Alternatively, cut the rack into two or three sections with kitchen shears and lay flat. Do not add any liquid.
- Cook. Place the lid on the slow cooker. Set to LOW and cook for 5 to 7 hours, until the meat has pulled back from the ends of the bones by at least ½ inch, the rack bends easily when lifted from the center, and a fork inserted into the thickest part of the meat meets no resistance.
- Preheat the broiler. In the final 15 minutes of cooking, preheat the oven broiler to HIGH. Line a large rimmed baking sheet with foil.
- Transfer the rack. Using two sets of tongs or a large spatula, carefully transfer the rack to the prepared baking sheet, bone side down. The rack will be very tender and may want to fall apart — handle gently.
- First coat and broil. Apply a generous coat of BBQ sauce to the top and sides of the rack using a pastry brush. Place under the broiler 5 to 6 inches from the element. Broil for 3 to 4 minutes, watching constantly, until the sauce is bubbling and beginning to caramelize at the edges.
- Second coat and finish. Remove the baking sheet from the broiler. Apply a second generous coat of BBQ sauce directly over the first. Return to the broiler for a final 1 to 2 minutes until the second layer is caramelized, sticky, and darkened at the edges. Watch continuously — the glaze can go from perfect to scorched in under a minute.
- Rest and serve. Remove from the broiler and rest for 5 minutes. Cut between the bones with a sharp knife or kitchen shears into individual ribs or 2 to 3 rib sections. Serve immediately with extra warmed BBQ sauce alongside.
Notes
- Remove the membrane — it is not optional. The membrane does not soften or break down during the slow cook regardless of how long the ribs cook. Ribs served with the membrane intact have a tough, chewy layer on the bone side that no amount of tenderness in the meat compensates for. Thirty seconds with a butter knife and paper towel. Do it every time.
- No liquid in the slow cooker. The fat and natural moisture in the rack are sufficient. Added liquid produces ribs that taste steamed rather than braised in their own drippings — the texture and flavor are noticeably inferior. Trust the process.
- Curl, don’t snap. When fitting the rack into the slow cooker, the ribs should curve, not crack. If the rack is too long to curl without snapping the bones, cut it in half with kitchen shears before inserting. Two half-racks stacked is fine — the lower rack cooks slightly more intensely but both come out well.
- The bend test. The most reliable visual check for done slow cooker ribs: lift the rack from the center with tongs. If the ends drop down and the surface of the meat cracks slightly — it is done. If it holds rigid or straight — it needs more time.
- Two coats of sauce is better than one. The first coat caramelizes and forms the base of the glaze. The second coat applied mid-broil adds another layer of sauce and prevents the first layer from drying out or burning. The difference is visible and worth the 90 seconds.
- Watch the broiler every second. The sugar in the BBQ sauce — and in the brown sugar in the rub — caramelizes very quickly under a preheated broiler. Stand at the oven. Check at the 3-minute mark. Adjust the rack distance if the sauce is charring faster than it is caramelizing. Perfectly charred edges are the goal; uniformly black is not.
- Save the cooking juices. The liquid that accumulates in the slow cooker during the cook is rendered pork fat and deeply flavored drippings. Strain it, refrigerate it overnight, remove the solidified fat layer, and use the clarified juices as a flavor base for baked beans, pork braises, or stirred into BBQ sauce. It is extraordinary.
- Prep Time: 10 minutes
- Cook Time: 5–7 hours (on LOW)
- Category: BBQ, Dinner, Main Dish
- Method: Slow Cooking
- Cuisine: American
- Diet: Dairy-Free, Gluten-Free
Frequently Asked Questions
What is the difference between baby back ribs and spare ribs — and does it matter here? Baby back ribs come from the upper rib cage where the ribs meet the spine — they are shorter, more curved, leaner, and naturally more tender than spare ribs. Spare ribs come from the lower rib cage and are larger, flatter, and fattier, with more connective tissue and a more intense pork flavor. Both work in the slow cooker, but spare ribs require longer cooking — 7 to 8 hours on LOW — to reach the same level of tenderness as baby backs at 5 to 7 hours. St. Louis-style ribs are spare ribs with the brisket bone and cartilage removed, producing a neater rectangular rack that handles similarly to spare ribs in cook time. For this recipe, baby backs are the correct starting point — they cook faster, are more uniformly sized, and their leaner meat works particularly well with the sticky BBQ glaze finish.
Why no liquid in the slow cooker? Every other slow cooker recipe uses liquid. Most slow cooker recipes use broth or water because the ingredients being cooked — lean chicken, vegetables, beans — need added moisture to cook properly and don’t generate sufficient liquid on their own. Baby back ribs are a fundamentally different situation: the fat content of the rack renders out during the long cook, and the natural moisture in the meat steams within the sealed environment of the slow cooker. The rack effectively self-bastes in its own drippings throughout the cook. Added liquid in this recipe dilutes the concentrated pork drippings that accumulate in the insert and produces ribs that taste steamed rather than braised in their own rendered fat. The no-liquid method produces a richer, more intensely flavored result.
How do I know when the ribs are done? Three reliable indicators: the bend test (lift the rack from the center — the ends should drop and the surface should crack slightly), the bone pull-back (the meat should have visibly receded from the ends of the bones by at least ½ inch), and the fork test (a fork inserted into the thickest section of meat should meet no resistance and feel like pushing into soft butter). Internal temperature for ribs is less useful than for other meats — ribs are “done” in terms of food safety at 145°F (63°C) but are only properly tender for eating at 190°F to 203°F (88°C to 95°C), which is the temperature at which collagen conversion is complete. Use the physical tests rather than a thermometer for ribs.
Can I cook two racks at once? Yes — a large 6 to 8-quart oval slow cooker can accommodate two racks of baby backs, either curled together or cut into sections and stacked. When stacking, rotate the racks halfway through cooking if possible so the bottom rack doesn’t spend the entire cook closest to the heat source. Add approximately 1 hour to the cook time for two racks. Both racks will need individual treatment under the broiler — work in two rounds, keeping the first broiled rack tented with foil while the second broils.
My glaze burned under the broiler. What went wrong? Glaze burning at the broiler stage is almost always a distance problem. The baking sheet was too close to the broiler element — the intense direct heat caramelizes the sugar in the BBQ sauce to the point of burning before the heat has time to penetrate and warm the sauce through. Move the rack position down to 6 to 8 inches from the element rather than 4 inches. Also check that the broiler had fully preheated — a partially preheated broiler can suddenly surge in intensity once it reaches full temperature. Finally, watch from the moment the pan goes in — there is no safe window to step away during the broil phase.
Can I make these ahead of time for a party? Yes — this is one of the best make-ahead party recipes in this style of cooking. Slow cook the ribs up to 24 hours ahead and refrigerate bone-side down in their cooking juices. When ready to serve, bring the ribs to room temperature for 30 minutes, then proceed directly to the BBQ sauce and broil finish — the cold ribs actually handle more easily under the broiler because they hold their shape better when partially chilled. The broil finish re-warms the meat and caramelizes the glaze simultaneously. For a large party, slow cook multiple racks in batches, refrigerate, and broil in succession as guests arrive.
What BBQ sauce should I use? The honest answer is: the one you genuinely enjoy eating on its own. Since BBQ sauce is one of only three ingredients in this recipe, its quality and flavor profile are directly detectable in every bite of the finished dish. A thick, smoky Kansas City-style sauce is the most versatile default. A tangy Carolina vinegar sauce produces a lighter, brighter result. A honey BBQ sauce caramelizes with particular intensity under the broiler. Avoid thin, watery sauces — they run off the ribs during the broil before they have time to caramelize. Whatever the style, choose a sauce with a thick enough consistency to coat and cling.
Can I finish these on the grill instead of the broiler? Absolutely — and a charcoal or gas grill finish adds the smoke and char that the broiler approximates but cannot fully replicate. Transfer the slow-cooked rack to a preheated grill over medium-high direct heat. Apply the first coat of BBQ sauce and grill for 3 to 4 minutes until caramelizing. Apply the second coat, close the lid, and grill for a further 2 minutes. Watch carefully — the ribs are already fully cooked and the sugar in the sauce will burn quickly over an open flame. The grill finish produces ribs with a slightly more complex, smoky character than the broiler version and is the correct choice when outdoor cooking is available.